Phil and I have been planning a climbing trip for the last six months or so, and the time has finally arrived. So, I'll be in the mountains until next Saturday and won't be able to post. Hopefully we'll return with some good pictures.
See you next Saturday.

Friday, March 30, 2012
Wednesday, March 28, 2012
The Alpine BOMB for the MSR Reactor
Starved for adventure (I blame school for that one) and sleep deprived (again, school), Phil and I finished our last day of class for the semester and headed into the Uinta Mountains of Utah to try to climb a frozen waterfall and a frozen pile of choss, which is called Red Castle. Red Castle is one of the most popular places in the Uintas for backpacking, but rarely does anybody venture in that area during the winter. The main reason for this is that the road is only plowed to about 8 miles from the trailhead and then there is an additional 12 miles of hiking from the trailhead to Red Castle. 20 miles of skinning or snowshoeing is usually enough to keep sane people away. Most climbers don't even go into that area because the only waterfall up there is about 70 feet tall and Red Castle is literally a pile of rocks held VERY LOOSELY together by mud.

Phil and I have never been accused of being very smart or sane, so we decided to give it a try. It took two very long days to hike into Red Castle pulling sleds. Once in there, we decided to climb the waterfall (about WI4+) a few times but judged that attempting to climb Red Castle, being so far away from anything, would be dumb. (A side note: Haunted by this experience, we went back during the summer to attempt a climb of one of the west faces of Red Castle. We ended up bailing after about two pitches because the rock quality was so poor. It was more like trying to climb hardened mud than actual rock)
This, believe it or not, is simply a long introduction to how I came to hate canister stoves for winter climbing. On day three of our trip, I was trying to heat up some water with my Jetboil so that I could have a warm drink and dinner. This stove normally takes about 3 minutes to boil 2 cups of water during the summer. On this trip, it took about 25 minutes to melt snow and bring the water to a boil, and that was while swapping out warm canisters from my belay jacket. I took me almost two hours to eat dinner, make some hot chocolate, and melt enough snow for the next day. I was so frustrated!
I went home, ordered a Reactor, and pawned my Jetboil off to my brother (He mostly does summer stuff anyway). I have found the Reactor to be far superior to the Jetboil when it comes to cold weather use, but it's still not perfect. Though much more efficient than any other canister stove I know of, the canister still gets really cold and the stove doesn't work nearly as well as it could.
A friend of mine is headed to Denali in about a month. To get ready for this trip, he and his climbing partner have been spending a lot of time this winter in the Tetons above 10k feet. My friend told me that he was worried about his stove situation because his reactor wasn't working all that well in super cold conditions (-10 degrees or colder). I told him I would try to help him come up with a solution.
Here's what I came up with:


My original designs were much more complicated and involved copper tubing being pounded flat, then wrapping that around the pot, and attaching that to the canister. Because of the way the Reactor is designed, I thought it would be too difficult to get the copper tubing under the pot and against the actual burner. Stealing heat from the pot seemed like the only way.
Four hours of failure later, I pounded some copper tubing flat, bent it into a shape that would hug the silhouette of the stove, and stuck the pot on the stove. Though the pot doesn't sit perfectly flat, it is hardly noticeable. The copper piece now transfers heat from the stove to the canister to keep the canister warm. I haven't tested this extensively, but so far so good. The copper definitely transfers heat efficiently, potentially too efficiently. The scary thing about Alpine BOMBs is that if the canister heats up too much, it will explode. I will be testing this tool a bit more extensively next week.
WARNING! PLEASE UNDERSTAND, THERE IS NOT A SINGLE STOVE MANUFACTURER IN THE WORLD THAT WOULD ENCOURAGE THIS. THIS IS POTENTIALLY A VERY DANGEROUS TOOL THAT SHOULD ONLY BE USED WITH EXTREME CAUTION AND SUPERVISION.
As I test this system, I am constantly next to the stove, checking the canister to ensure that it doesn't get too warm. This system was designed only to be used in extreme cold.
Also, because there were a couple sharp corners on the copper that I didn't sand down, I accidentally put a hole in my neoair mattress. So, sand off the sharp edges.
I originally saw this idea on http://www.ademiller.com/blogs/climbing/2005/12/gear-the-alpine-bomb.html. He gave a thorough explanation of why canister stoves just don't work well in the cold. The article is worth reading. His Alpine BOMB looks like this:


Red Castle during the summer
Phil and I have never been accused of being very smart or sane, so we decided to give it a try. It took two very long days to hike into Red Castle pulling sleds. Once in there, we decided to climb the waterfall (about WI4+) a few times but judged that attempting to climb Red Castle, being so far away from anything, would be dumb. (A side note: Haunted by this experience, we went back during the summer to attempt a climb of one of the west faces of Red Castle. We ended up bailing after about two pitches because the rock quality was so poor. It was more like trying to climb hardened mud than actual rock)
This, believe it or not, is simply a long introduction to how I came to hate canister stoves for winter climbing. On day three of our trip, I was trying to heat up some water with my Jetboil so that I could have a warm drink and dinner. This stove normally takes about 3 minutes to boil 2 cups of water during the summer. On this trip, it took about 25 minutes to melt snow and bring the water to a boil, and that was while swapping out warm canisters from my belay jacket. I took me almost two hours to eat dinner, make some hot chocolate, and melt enough snow for the next day. I was so frustrated!
I went home, ordered a Reactor, and pawned my Jetboil off to my brother (He mostly does summer stuff anyway). I have found the Reactor to be far superior to the Jetboil when it comes to cold weather use, but it's still not perfect. Though much more efficient than any other canister stove I know of, the canister still gets really cold and the stove doesn't work nearly as well as it could.
A friend of mine is headed to Denali in about a month. To get ready for this trip, he and his climbing partner have been spending a lot of time this winter in the Tetons above 10k feet. My friend told me that he was worried about his stove situation because his reactor wasn't working all that well in super cold conditions (-10 degrees or colder). I told him I would try to help him come up with a solution.
Here's what I came up with:

After four hours of failure, this took about two minutes to make.


I will be making a closed-cell foam cozy for the canister. The current cozy is just part of an old wool sock. The sock isn't nearly as efficient as closed-cell foam and I am afraid that it could catch fire or melt if the copper gets too hot.

My original designs were much more complicated and involved copper tubing being pounded flat, then wrapping that around the pot, and attaching that to the canister. Because of the way the Reactor is designed, I thought it would be too difficult to get the copper tubing under the pot and against the actual burner. Stealing heat from the pot seemed like the only way.
Four hours of failure later, I pounded some copper tubing flat, bent it into a shape that would hug the silhouette of the stove, and stuck the pot on the stove. Though the pot doesn't sit perfectly flat, it is hardly noticeable. The copper piece now transfers heat from the stove to the canister to keep the canister warm. I haven't tested this extensively, but so far so good. The copper definitely transfers heat efficiently, potentially too efficiently. The scary thing about Alpine BOMBs is that if the canister heats up too much, it will explode. I will be testing this tool a bit more extensively next week.
WARNING! PLEASE UNDERSTAND, THERE IS NOT A SINGLE STOVE MANUFACTURER IN THE WORLD THAT WOULD ENCOURAGE THIS. THIS IS POTENTIALLY A VERY DANGEROUS TOOL THAT SHOULD ONLY BE USED WITH EXTREME CAUTION AND SUPERVISION.
As I test this system, I am constantly next to the stove, checking the canister to ensure that it doesn't get too warm. This system was designed only to be used in extreme cold.
Also, because there were a couple sharp corners on the copper that I didn't sand down, I accidentally put a hole in my neoair mattress. So, sand off the sharp edges.
I originally saw this idea on http://www.ademiller.com/blogs/climbing/2005/12/gear-the-alpine-bomb.html. He gave a thorough explanation of why canister stoves just don't work well in the cold. The article is worth reading. His Alpine BOMB looks like this:


I hope to have a little more information about the performance of the stove with and without the copper in a couple weeks.
05/18/2012 - It has been almost two months since I made the Reactor BOMB, but I've only had one chance to use it in cold weather. This past week I used it on Mt. Rainier in about 25 degree F weather. In the same weather without the copper heat exchanger, the canister would get very cold and the efficiency would drop immensely. With one copper heat exchanger at about 25 degrees, the canister wouldn't get cold or hot and the efficiency would stay about normal. It boiled 1.5 liters of ice cold water in about 3.5 minutes in 25 degree weather. This is about the same amount of time that it takes during the summer.
I'm sure that another copper heat exchanger would be necessary to keep the canister warm if the temperatures were significantly colder, but one worked fine for the temperatures I used.
The stove gets so hot that the copper turns black and becomes weaker. I don't think the copper heat exchanger is going to be a very durable and with extended use it will eventually break. Luckily, with practice, these exchangers only take about 5 or 10 minutes to make and don't cost very much.
Tuesday, March 27, 2012
The New Wild Things Belay Jacket vs Some Others (How's that for specifics?)
Ever since I was 16 and I laid my hands on a Wild Things backpack for the first time, I have been a huge fan. I bought a few pieces of Wild Things clothing as well and they have been with me just about everywhere. I was just about to buy a Wild Things belay jacket when they stopped making climbing gear and started only making tactical clothing and packs for the military.
A few years later and Wild Things climbing clothing and packs are back! I wasn't sure what kind of quality and design to expect from them considering their hiatus and change in ownership (their founder is still on their board and still designs much of their stuff), but so far everything is looking like the old gear that I was in love with.
One jacket in particular that has my eye is the Wild Things Belay Jacket. Here are some specs:
- 100% 70 denier nylon, Epic by Nextec shell
- 6 oz. PrimaLoft® Sport synthetic insulation
- Erictex, 100 poly, 30d lining
- Adjustable, helmet compatible hood
- Two-way center front zipper
- Interior mesh drying pocket
- Interior zippered pocket
- Single-pull adjustable hem
- Weight: 2 lbs 4 oz
- Made in U.S.A.


One internal mesh pocket

One internal zippered pocket

EPIC by Nextec® Shell. From Wild Things: No laminates. No coatings. The protection
is inside the 100% nylon 70 denier face fabric, encapsulating the actual fibers
for weatherproof, breathable performance. The result? A highly water/wind
resistant, abrasion resistant shell that breaths


Helmet compatible hood. From Wild Things: The adjustable hood fits tightly over a
climbing helmet and offers great visibility and mobility. Elastic along the back
of the hood keeps the fit snug while you move your head, so the hood stays put.
These photos are from www.wildthingsgear.com
Everything looks great to me except for the weight. I imagine that weight is for a medium. A little heavy. In comparison to some other well-known belay jackets, this is about 12oz heavier than the Arc'teryx Dually Belay (according to their factory listed weights, which may vary significantly), 10oz heavier than the Patagonia Das and the Mec Tango, and 7oz heavier than the Rab Photon Belay Jacket.
As far as warmth, I would guess that they are all fairly comparable in warmth considering the type of insulation used and how much of it is in the jacket. The Das is the only jacket mentioned that is sewn all the way through. For that reason I would guess that the Das is slightly less warm and less water resistant. I know that a lot of people love the Das. Please don't send hate mail. The Wild Things belay uses Primaloft Sport instead of Primaloft One, which is not quite as efficient though a little more durable over time. The Rab uses Primaloft Eco, which is a step down in function as well.
The Dually is most likely the most weather resistant and potentially the warmest of all these mentioned because Arc'teryx's Dually insulation, Thermatek (essentially DWR-treated Primaloft), will not soak up water and it is laminated to the shell fabric, not stitched, which means less compression where the insulation would normally be stitched. More loft = More Warmth.
The Wild Things uses Epic Shell fabric, which is more weather resistant than the shells of the other jackets (from my experience). Therefore, I would guess that the Wild Things Belay Jacket would be the 2nd most weather-resistant of the group.
At $250, it looks to be an absolute steal for what the jacket offers (compared to the $500 price tag of the Dually). As far as its heavy weight is concerned, my bet is that it's not much heavier than the other jackets considered. Dane at Cold Thistle compared weights of many of these jackets (and a bunch of others) with his own scale and found them all to be quite a bit heavier than their posted weights. To be fair, he was measuring, in most cases, XLs and most companies advertise the weights of Mediums. Comparing materials, features, etc, the Wild Thing jacket should come in pretty close to the others. If it is slightly heavier, that means you are getting a little more weather protection and abrasion resistance from the shell.
As far as their other products are concerned, everything at Wild Things is starting to look about like it did before they left, which is a great thing!
For more information on Wild Things Gear, check out http://www.wildthingsgear.com/
For a good, side-by-side comparison of some popular Belay Jackets, check out Cold Thistle here:
It's fun to do a little rock climbing again
Ogden weather is fickle. I can't figure it out. Saturday Phil and I went rock climbing and it was 70 degrees and sunny. Today it snowed. Tomorrow it's supposed to be almost 70 again. I'm not sure whether to pray for snow (which has been in extremely short supply this winter) or embrace the sun. Either way, the climbing on Saturday was really fun!
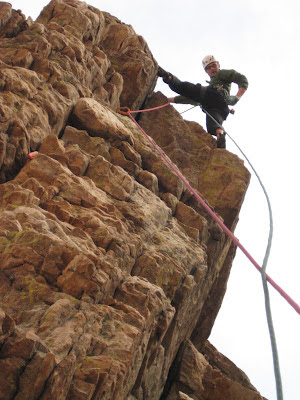
We headed up Ogden Canyon to Utah Wall. There's a route there, Air Time (5.10c), that is really fun. It is slightly overhung in places and follows an arete that eventually hangs out over about 100ft of air (hence the name). I think that this route was originally climbed by one of the Lowes (Greg or Jeff), but I'm not 100% sure. The fact is, the majority of the best routes in Ogden were first climbed by the Lowes, so it's usually pretty safe to give them credit for it.
Because we wanted to get pictures and there were only two of us, we decided to fix a couple lines and rope solo.
Anyway, here are some pictures:

The lower part of the route is slightly overhung but has nice, large holds. Really fun section!


The middle section is the crux. The moves go from a mediocre undercling with the right hand with poor feet to a thin but decent finger crack, to a small crimp, to a decent pinch, to a perfect hand sized crack that pulls the roof. It's a really fun sequence! At the top of this picture is a bulge. You pull the bulge into a small pod and at the back of the pod is where the hand crack roof starts.

The finger crack is actually where the nut is placed. I got a little off route right here and had to climb back down to get on the correct moves.


If you tuck your shoulder in there is a no-hands rest before the roof


Perfect hand-sized roof. Careful, this section eats #2 and #3 camalots, especially if you're tired and a little worried about the exposure.


After the roof there is a fairly easy, albeit awkward traverse with about 100 feet of air below your feet.

If you live in Ogden and haven't tried this route, or you are visiting Ogden and want to try an exciting, 5.10 trad route, this is a great option!
Saturday, March 24, 2012
A look back at this winter's favorite gear
I can't help it. It's been 70 degrees and sunny in Ogden and my mind is automatically shifting from ice to rock climbing. I have been trying to stay focused on ice climbing because I have a trip coming up to some higher mountains and bigger lines. I have been watching ice climbing videos, training on my ice tools, and playing with my other ice climbing gear, but the whole time I'm dreaming about all the long rock routes I want to do this summer.
So, as ice season is passing in Ogden, I want to briefly reflect on my favorite gear from this winter. This is gear that has been with me on pretty much every outing and I am very happy with. I will also add a few pieces of gear that Phil has been using all winter and loving. I will not be adding pieces that I have taken climbing out of default (because I have no other option). This is all gear that I love and therefore CHOOSE to take with me instead of a different option.
I have been able to ice climb about 30 days this winter, which isn't a ton, but I feel pretty happy with it, considering I'm a full-time student and in the process of opening a business.
The Gear
Black Diamond Torque Gloves- These gloves are awesome! The grip is incredible and the dexterity is hard to beat. I layer a light merino liner under them and my hands have been warm from 15-30 degree teperatures. I think I only got the screaming barfies once this winter. These gloves are a little light duty, I'm afraid. 30 days of ice, a few days of drytooling, some training on a plice tower, and some hiking and they are ready to be replaced. I guess they're not really designed to be a a heavy-duty glove. But, even though the grip is getting pretty worn, they have still been quite water-resistant.


Arc'teryx Rho ltw zip baselayer- I have a lot of other baselayers, but this is always my first choice. If I have two or three outings planned in a week, I save this one for the best climb and use the others on lesser climbs. This baselayer is super comfortable, wicks moisture well and dries quickly, doesn't stink, even after 3 years of using year-round, and fits extremely well. It has long, stretchy sleeves which I really appreciate for ice climbing. Sometimes I'll tuck the sleeves into my torque gloves to keep my wrists covered, which really helps to keep my hands warm. It is also super durable. I have scummed up chimneys, hiked countless miles with a pack, and washed it probably 150 times, and it still looks new.

NWAlpine Black Spider Light Hoody- I have already written many times about this piece (http://gearthirty.blogspot.com/2012/03/lightweight-midlayers-my-favorites.html). The combination of lightweight, quick-drying material, great design and fit, and affordable price tag make this one of the best base/midlayers I have ever used. I do occasionally wear this as a baselayer and it works quite well. I rarely go climbing without it.

Arc'teryx Acto MX Hoody- I have already done an in-depth review on this piece (http://gearthirty.blogspot.com/2012/02/arcteryx-acto-mx-hoody-review.html), and my opinion hasn't changed. I have been looking a lot at other softshell jackets, but I can't think of a better material for active use during the winter than what is used on this jacket. Maybe Neoshell. This jacket has pretty much replaced my hardshell (I used my hardshell three times this winter, two of which were skiing). It does let a little bit more wind through than I would consider ideal for a shell, but when moving fast, I rarely get sweaty (I sweat, but it evaporates quickly).


Marmot Zion Jacket- This has been Phil's go-to jacket all winter long. Whenever we were hiking or climbing and I was sure he'd be overheating and sweaty, I'd ask him how he feels and he'd reply, "I feel great! I can't believe how well this jacket breathes!" He'd often throw the jacket on to dry off once we got up to a climb and were racking up. Read an in-depth review here: http://gearthirty.blogspot.com/2012/03/marmot-zion-neoshell-jacket-review.html


Arc'teryx Atom LT Hoody- This jacket goes almost everywhere with me, winter or summer. It has mostly been my belay jacket this winter because temperatures have been fairly mild. On really cold mornings, it turns into my climbing jacket. I love EVERYTHING about this jacket. If you don't have one yet, you're missing out, in my opinion. A better review here: http://gearthirty.blogspot.com/2012/01/arcteryx-atom-lt-hoody-i-just-wanted-to.html

Mid-October climbing on the Middle Teton in the Atom LT Hoody
NWAlpine Fast/Light Pant- In-depth review here: http://gearthirty.blogspot.com/2012/02/nwalpine-fast-and-light-pant.html. I love the fit, simplicity, key features, and material of these pants. They aren't perfect, but pretty close, and for $110 they are hard to beat. My go-to pant for pretty much all winter activities, especially climbing.

Cilogear Worksack- I haven't even touched another backpack this winter (except for my bc skiing pack), and I have seven other packs to choose from. I imagine it will be my go-to pack on most summer climbing outings as well. Full review here: http://gearthirty.blogspot.com/2012/03/cilogear-worksack-60l-review.html. My only regret with this pack is that I didn't also get a 30 liter worksack.

Camp Awax and Cassin X-All Mountain Tools- I have used many other tools over the years, including Nomics, Quarks, Vipers, Cobras, and Reactors, and I haven't found another tool that I like better than the Camp Awax and Cassin X-All Mountain. I even spent a week in Ouray with all of these tools side-by-side (except the Cassins), and my consensus was that the Awax was my favorite (the Nomic being a fairly close second). Phil has been climbing with the X-All Mountain tools this winter and ended up selling his other set (Reactors) because he didn't think he would use them again. I think that the X-All Mountain is possibly the most underestimated tool on the market. The picks on these tools penetrate all types of ice extremely well (sometimes too well, but a little modification to the picks help them pull out of the ice easier). They have held up quite well to drytooling and even camming in horizontal cracks. Great tools!

CAMP Awax Tools

Cassin X-All Mountain Tools
Petzl Dartwins- This is the first year I have owned Dartwins, but I have never used a better crampon for vertical ice and mixed. They skate a little too much on low-angle ice, but I don't even want to touch my other crampons when I'm headed to climb a waterfall. They do tear holes in my pants a little more efficiently than other I've used, but I was amazed at how much more secure my feet feel on steep ice with these crampons compared to some others I have owned or used.

Scarpa Phantom Guide Boots- After climbing vertical ice in these boots, I shudder at the thought of going back to my leather boots. These boots hold onto my heel and foot so well, they have pretty much eliminated calf burning for me. Now that's not to say that my calves wouldn't burn on a long, sustained climb in these boots, but my calves would usually start to burn while climbing on our local waterfalls, but I haven't had even the slightest bit of calf strain on these same waterfalls with the Phantom Guides. Some more thoughts on these boots here: http://gearthirty.blogspot.com/2012/03/few-thoughts-on-scarpa-phantom-guide.html

Wednesday, March 21, 2012
A few thoughts on the Scarpa Phantom Guide Boots
*You can also read this review at http://www.gearthirty.com/blog/2012/05/04/a-few-thoughts-on-the-scarpa-phantom-guide-boots/. You can also find information on hiking, climbing, and paddling destinations; how-to articles; and local, national, and world news from the outdoor industry. Please check out www.gearthirty.com.

I mentioned about a month ago that I now have Scarpa Phantom Guide boots in my possession to test out. After a month of testing, I now have a couple comments to share. I plan to write a much longer, more comprehensive review of them in a few more weeks after I get a few thousand more feet of climbing done in them.
I have currently done about 1,500 feet of ice climbing, about 200 feet of rock climbing (without crampons) and about 15 miles of hiking in them. That is not a ton, which is why I want to climb and hike in them more before totally reviewing them.
So far, here are a few thoughts:
The Phantom Guides have a softer shank than I was expecting. This makes hiking nice but I was afraid that it may cause problems with the fit of my crampons. So far I haven't had any problems with crampon fit due to the little bit of give in the shank, but the narrowness of the front welt means that only my dartwins fit well. My Grivel G14 bars are too wide, but I haven't tried the bars from the G20 or G22. Black Diamond bars are a better fit, but still not as solid as the Petzl bars. Once my darts are on the boot and snug, there is absolutely no give in the shank. I think that it is a very good design; a little give for the hike, no give for the climb.

Phantom Guide seems to fit well with the Petzl bars on my Dartwins.
Another thing that I am extremely impressed with is the fit in the heel. These boots really lock my heels down. 500 feet of steep ice gets my calves burning in my other boots, but these boots lock my heels down so well, I haven't noticed any calf burning at all.

I did about six 150' laps without the slightest bit of calf burning. That same amount would have meant burning calves in my other boots. Climbing WI4+ ice in these boots really felt effortless.
I generally wear a size 45-46 in most boots. These boots are a 46 and, though they seem to be the right length, they are a higher volume boot than I was expecting. There are a couple advantages and disadvantages to the extra volume. (My foot is not extremely narrow, nor is it very wide, but it is a little bit lower volume than the average foot)
First of all, I notice my forefoot sliding around laterally a bit in these boots while I hike, especially on the downhill. This isn't usually too much of a problem, but my feet did get a little sore after traversing a steep slope for about 45 minutes. My heels don't slip one bit while hiking or climbing.
Second, these boots don't seem to be as warm as my single leather boots (Salomon Super Mtn 9). I was expecting them to be warmer, but I think the additional volume means there is more room for my feet to keep warm, which isn't as efficient.
For the advantages, the higher volume boot does allow me to wear a combination of thicker socks which helps with the warmth factor and the lateral sliding (though it doesn't solve the problem).
Finally, the higher volume is slightly more comfortable than the narrower fit of my Salomons for general trail hiking. The Salomons seem to hold my foot in place better on traverses, but the majority of the hiking I have done in them has been on trails while hiking to a climb.
These boots feel significantly lighter than my Salomons and feel much more sensitive, especially while rock climbing. I am much more confident edging on rock in these.
I love the built-in gaiters. I normally hike with semi-loose boots to the climb, and then tighten my boots just before I get on the ice. This also means that I usually have to untie my pant-gaiters to tighten my boots. With these boots I don't have to use my pants as gaiters (though I still occasionally may) so it's easier and faster to adjust the tightness of my boots.
Another advantage to the gaiters is that they keep the boots very dry. These boots are insulated with Primaloft and they use OutDry technology for the waterproof gaiter. This, in my experience, makes for a waterproof, extremely quick-drying boot. My leather boots dry quite slowly (think a day at room temperature) and these boots dry in an hour or two at room temperature, depending how much I sweat in them.
Super-gaiter outer with Tizip waterproof zip
Subscribe to:
Posts (Atom)