Ueli Steck has always amazed me with his climbs. He is an absolutely incredible athlete. Here is a link to his latest climb; Everest, without supplemental oxygen, in his own words.
http://www.uelisteck.ch/en/news/news/330-everest-abschlussbericht.html

Wednesday, May 30, 2012
Monday, May 28, 2012
Incredible Alpine Climbing by Josh Wharton
I read this short article recently from Rock and Ice about Josh Wharton's recent alpine climbing ascents. He climbed Wild Thing (VI M7 WI5, 4300ft) on the east face of Mount Chephren, Infinite Patience (VI 5.9 M5 WI5, 6000ft) on the Emperor Face of Mt. Robson, and Greenwood/Locke (5.8 A2, 4000ft) on the North Face of Mount Temple all in one week. The climbs are absolutely incredible and extremely difficult, and to do all three of these climbs in one week is ridiculously difficult. The article is well worth reading.
http://www.rockandice.com/news/2002-josh-whartons-amazing-alpine-climbing-week
On a different note, I've noticed that Duane Raleigh, a writer (the editor?) for Rock and Ice, has made some pretty strong statements recently. About Conrad Anker he wrote, "Conrad Anker Crushes Everest w/o Oxygen." And about Josh Wharton's recent climbs, he wrote, "[Josh]. . . left the Canadian Rockies wondering what baseball bat they'd been beaten with." Now, I understand that these feats are pretty incredible and that Mr. Raleigh is excited about them, but since when have these mountains ever been "crushed" or "beaten" by climbers? The fact is that, to successfully climb these mountains, the mountains have to cooperate. I'm pretty sure no climber "beats" or "crushes" a mountain. Just a thought.
Wednesday, May 23, 2012
Alex Honnold and Tommy Caldwell set another record in Yosemite
Everybody knows about Alex Honnold and Tommy Caldwell. Each of them have broken more records and done more firsts in Yosemite than I can count. So, what happens when they join forces? They climb El Cap, Half Dome, and Mt. Watkins in 21h 15min, free. Dean Potter is the only other person to link these climbs in a day, but he didn't climb them all free. Alex and Tommy did in less than one day what takes the average climber over 11 days to do. More information on their feat can be found here:
http://www.alpinist.com/doc/web12s/newswire-caldwell-honnold
http://www.alpinist.com/doc/web12s/newswire-caldwell-honnold
Monday, May 21, 2012
Scarpa Phantom Guide vs La Sportiva Batura Evo

Introduction

Ice climbing in Phantom Guide

On the summit of Rainier in Batura Evo
A little over two weeks ago, I went on a quick overnighter with my wife and father-in-law in preparation for our recent Mt. Rainier trip. I was hiking in my older Salomon Super Mtn 9 boots (which I've had for years), my father-in-law in Phantom Guide boots, and Kelsey in her hiking boots.
After about one mile of hiking on the trail in my boots, I had a blister on my heel. In spite of using moleskin, liner socks, and tricky lacing, my feet were a mess after the trip was over. I knew that I would have a problem on Rainier, so I decided to get some new boots (normally not a good idea to do right before a trip). I had tested my father-in-law's Phantoms for about four months and knew that I liked them, but I was also curious to try the Baturas. I searched for a good deal, found some Baturas, and ordered them. Then I found a better deal on some Phantom Guides, and ordered those too. I figured I'd check both of them out and send one back.
After hours of walking around the house in both boots, I was stumped. I couldn't decide which boots to keep. The Baturas seemed like a more substantial boot; stiffer, heavier, warmer, bigger, etc. It seemed like I would be getting more boot for the money. It also gave me a little more confidence. On the other hand, the Phantom Guides seemed lighter, nimbler, more comfortable, softer, less substantial. I liked them both, but for different reasons. So, I kept them both. In fact, because my father-in-law and I have the same size foot, he bought one pair from me and we figured we'd share boots, depending on what boot would be better suited for the trip we would be going on. He sold his other Phantom Guide boots that were a half size too big for him.
The Stats
These descriptions and stats and info are taken off of La Sportiva's and Scarpa's websites:
Phantom Guides-
Redefining mountain performance, this boot is suitable for challenging the most technical routes in cold climates, whether ice cragging or in the high mountains.
- Upper: Cordura® and Elastan 10% (S-tech Fabric)
- Lining: Waterproof-OD/Primaloft®
- Insole: Pro-Fiber
- Midsole: PU/TPU
- Sole: Vibram® TT3
- Last: AG
- Sizes: 38 - 47, 48 (half sizes)
- Weight: 900g; 1lb 15.7oz (2lb 8.4oz in size 45.5 on my own personal scale)
- Color: Orange
La Sportiva Batura Evo-
EVOLUTION OF THE ULTIMATE LIGHTWEIGHT, LOW PROFILE, ALL SYNTHETIC MOUNTAIN BOOT FOR HIGH ELEVATION ALPINISM, WINTER MOUNTAINEERING AND ICE CLIMBING.
WEIGHT: 34.67 oz • 983 g (2lb 13.4oz in size 46 on my own personal scale)
LAST: Nepal
GAITER: Elastic Cordura/ Schoeller® -Dynamic™ with water repellant membrane/ Vibram® rubber rand/ Elastic nylon with impermeable insulating layer
LINING: Polyamide Thermic layer/ Mesh
INSOLE: Insulating Ibi-Thermo 9mm
MIDSOLE: 8-9mm TPU/ PU Inserts/ SBR Aircushion
SOLE: Vibram® with Impact Brake System™
SIZES: 38 - 48 (half sizes)
COLOR: Yellow/Black
PRICE: $550 USD
My Experience
As I said, I have been using the Phantom Guides for ice climbing since January. I love these boots. They are awesome to climb in and they feel light, nimble, and comfortable to hike in. I've already posted a lot of my thoughts on the Phantom Guide Boots which you can read here: http://gearthirty.blogspot.com/2012/03/few-thoughts-on-scarpa-phantom-guide.html.
I wore the Baturas for the first time on Rainier, except the bit that I wore them inside. I climbed the whole mountain without a hotspot. I did have sore feet by the end of each day from hiking in them, but I had sore feet after a day of hiking in the Phantom Guides too. The rest of my experience and comparison will be made with descriptions of the pictures.

Scarpa Phantom Guide in a size 45.5. La Sportiva Batura Evo in size 46. They are actually exactly the same length according to the footbeds, and they feel the same length on my feet. The Baturas are definitely a bigger boot, but they feel narrower in the forefoot than the Phantoms. I feel like I can get a snugger overall fit in the Baturas than I can in the Phantoms, though the Phantoms lock my heels in place better. If you have wider feet, I think the Phantoms may fit better.

The Batura looks wider, but it isn't on the inside. It is a bigger and warmer boot, but has a narrower last.

Batura has a taller integrated gaiter. Both zippers are top-notch and should be waterproof and last a long time. The YKK zipper on the Batura zips easier, but I think the TIZIP zipper on the Phantom is the better zipper. I would be really surprised if either zipper failed, even after many years of use.

The integrated gaiter is about double the thickness on the Batura than on the Phantom. That's one reason why the Batura is the warmer boot, but maybe only for the first day or two. I say that because the Batura dries much slower than the Phantom. After Rainier, the Phantom was dry after a day. The Batura was still moist inside the boot this morning, four days after the climb. I purposely left both boots zipped up after the climb because I wanted to see how long it would take for them to dry. So, if the Batura gets wet and then doesn't dry quickly, by day two or three it will not be nearly as warm as day one. For that reason I would suggest that the Phantom may be a better option for multi-day cold-weather climbs. The Batura may be a good option for multi-day winter outings if you use a vapor barrier. Better yet, just get a double boot for multi-day winter trips.

Again, the gaiter.

The Phantom is on the left, the Batura on the right. The toe of the Phantom is narrow, making precision edging and rock climbing fairly easy (for a mountain boot). It is much more difficult to fit crampons on the Phantom Guides, however, and most every crampon I've tried fits well on the Baturas.

A look at the soles. Again, the Phantom is on the left.

The Phantom Guide has deeper lugs and has a softer rubber to reduce impact, but the Sportiva uses their Impact Brake System that increases grip and decreases impact. The Phantoms feel softer to walk in, but I can't tell if that's because of the rubber or the softer shank. Maybe both.


Both boots have good protection against crampons and wear on the inside of the boot, but the Batura's is all rubber (no breathability) and the Phantom's upper section of black on the instep is fabric (less durable but more breathable).

Sportiva's Impact Brake System. The lugs are offset to increase grip and decrease impact. The logic behind it seems sound, but I can't tell how well it works. They seem to slip just as easy as other boots. Can't hurt, I guess.

Narrower toe welt on the Phantom making crampon fitting a pain. The toe of the Batura seems a little more robust too, meaning they will probably be more durable over time while kicking ice during ice climbs.

Phantom Gaiter again.

Batura Gaiter again. The Batura gaiter is definitely the nicer gaiter, but the Phantom gaiter works just fine. I kind of feel that the Batura gaiter, though very nice, is extra unnecessary weight. The Phantom gaiter is much lighter and works fine in snow. The Batura gaiter is warmer.
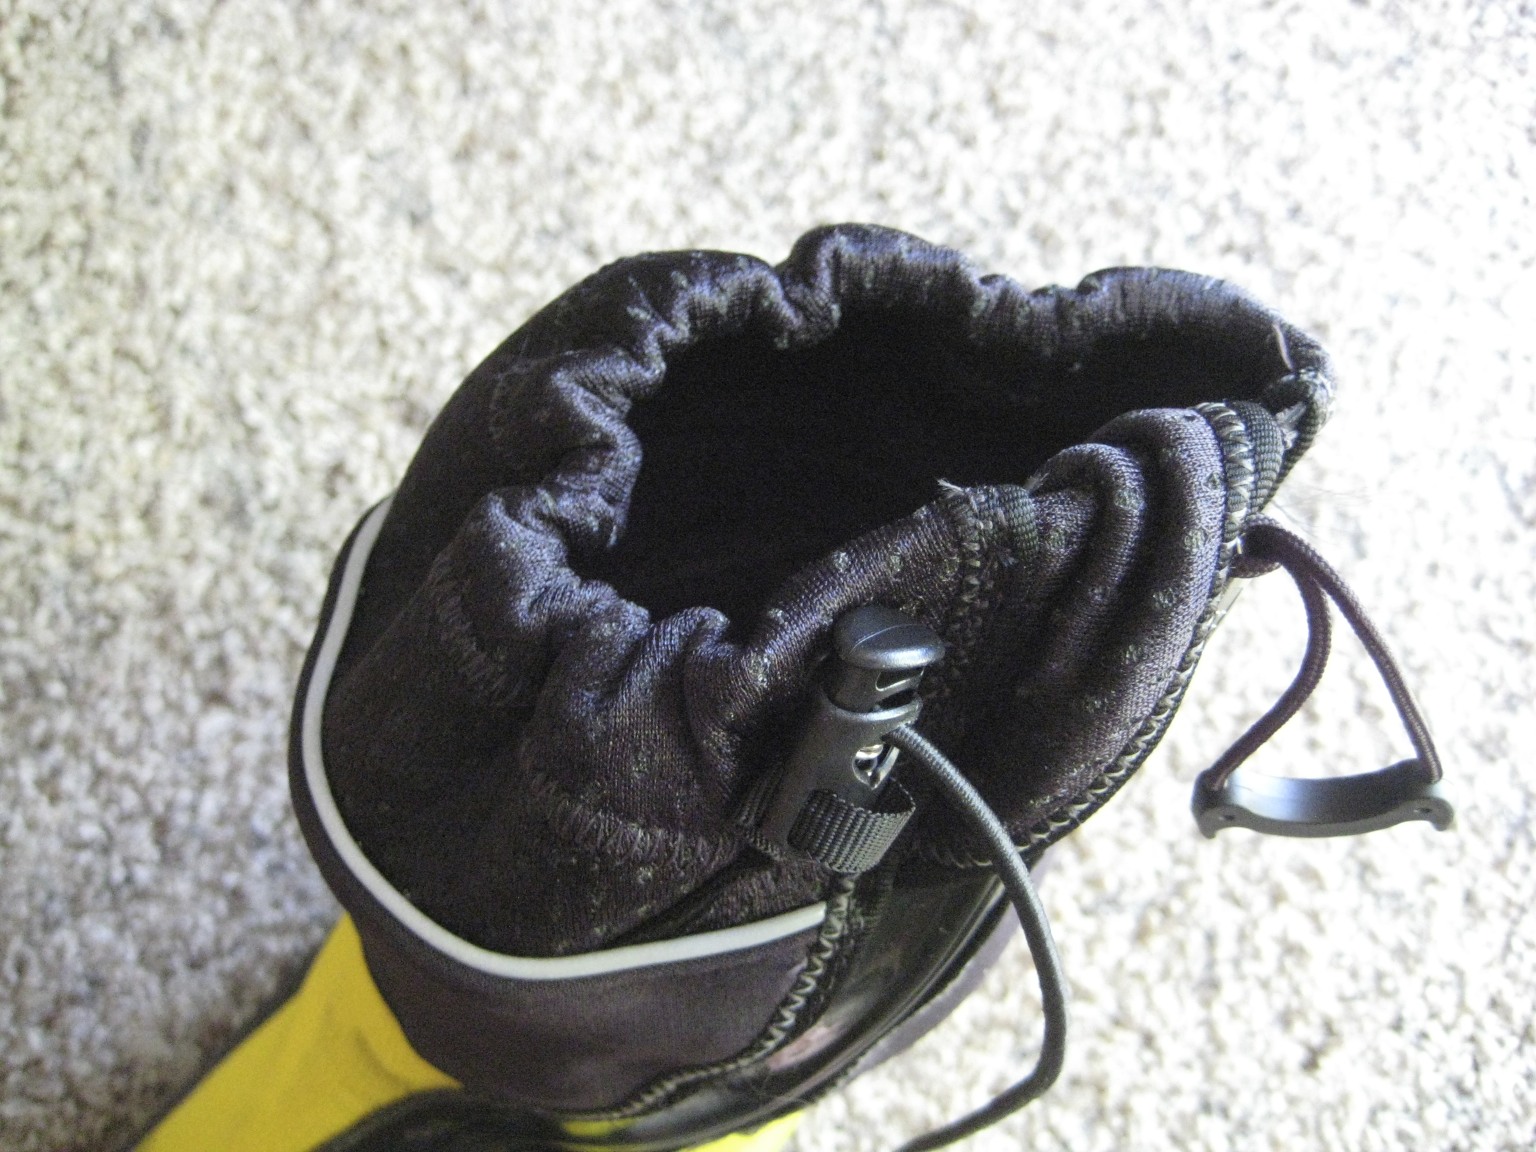
Batura Gaiter cinched.

The Phantom insole is on the top and is quilted with Primaloft. I'm not really sure how much warmth the primaloft adds because it gets compressed while standing on it, but I'm sure it doesn't hurt. It is definitely a nicer footbed than the one in the Batura. The Phantom footbed provides more cushion and warmth than the Sportiva footbed.
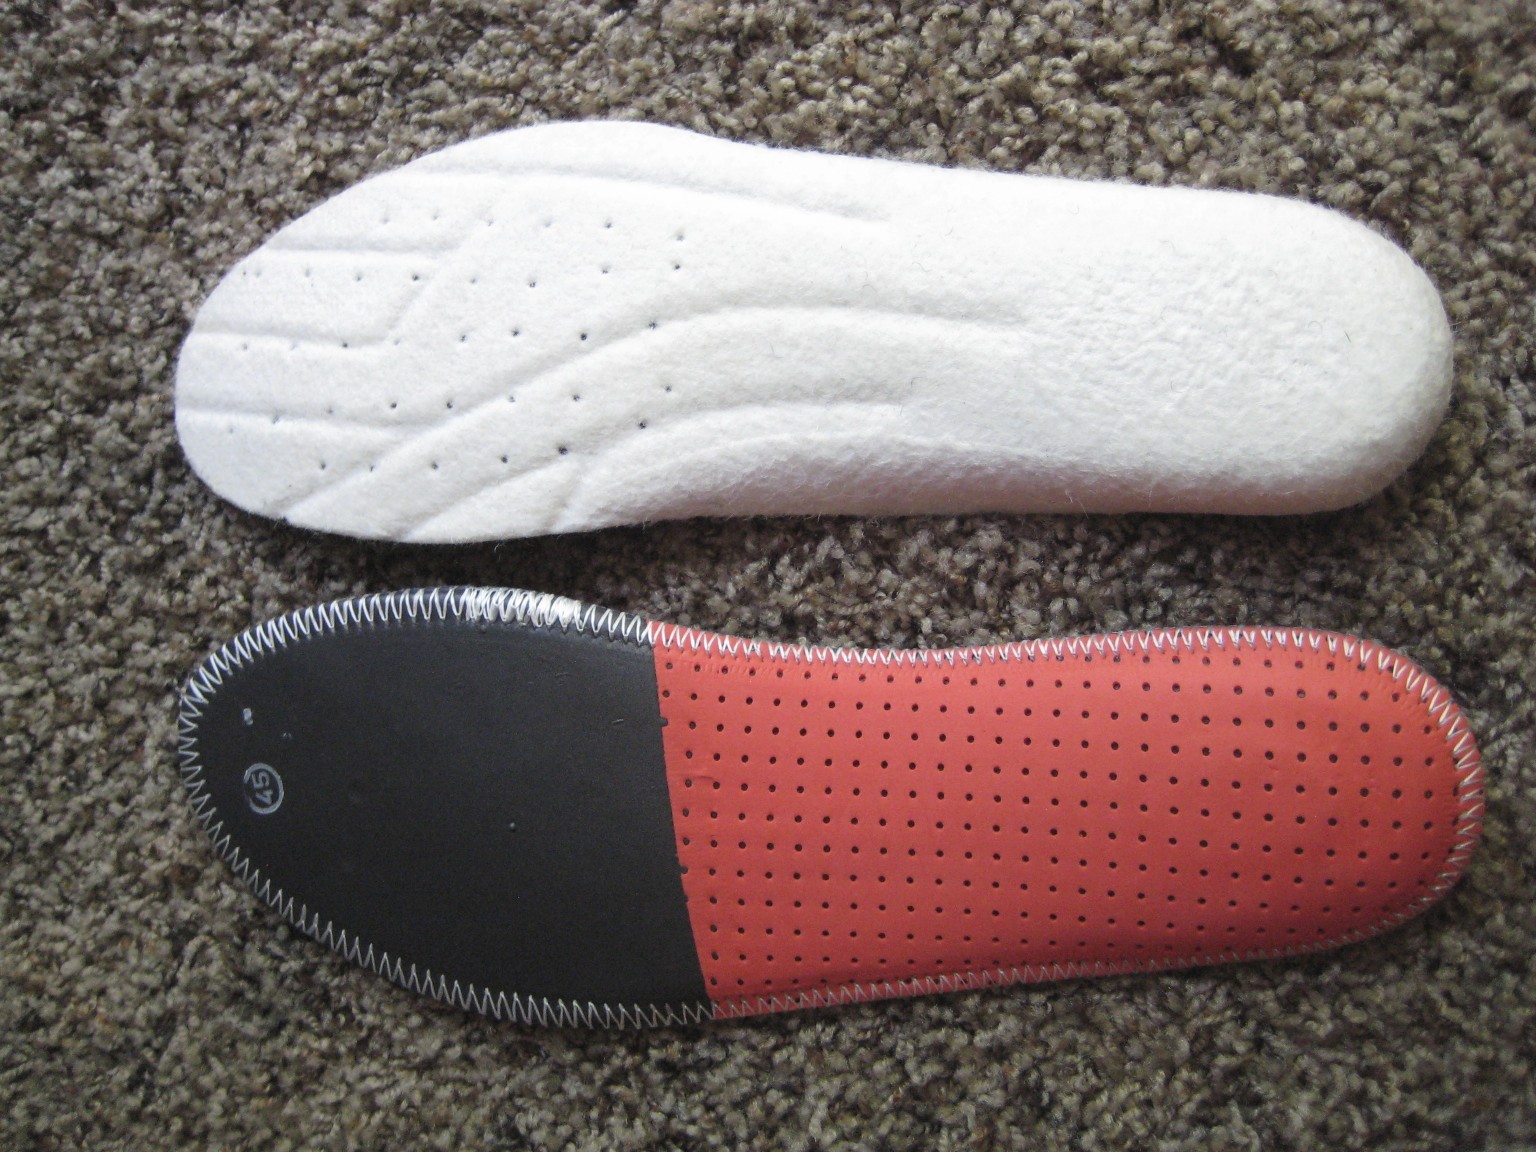
This time the Phantom footbed is on the bottom.

The gray Scarpa footbed is under the Sportiva footbed. The size 46 Batura is almost the exact same size as the size 45.5 Phantom. If you can see in the picture, the Scarpa insole extends just a little bit longer and wider than the Sportiva.

The Batura boot uses a thicker 3D mesh padding to insulate, which is why the boot feels lower volume than the Phantom. The Phantom is insulated by Primaloft which is lighter and takes up less volume. It also dries quicker than the 3D mesh. I think the combination of the 3D mesh and the thicker, neoprene gaiter is why this boot dries slower than the Phantom.


The quilted Primaloft insulation on the inside of the Phantom.

The ankle of the Phantom is fairly soft and very comfortable to walk in.

The Batura ankle is bit stiffer than the Phantom, but not too stiff. It is slightly less comfortable to hike in than the Phantom, but still not bad.

The longer Batura zipper that extends to the side of the boot allows for a big opening for drying, but it adds more weight. The Phantom zipper is shorter and therefore lighter than the Batura.

The Batura fitted with a Grivel G14 crampon. As you can see, the bail doesn't fit perfectly, but it's not too bad.

The Phantom Guide fitted with the Grivel G14 crampon. The narrower toe and toe welt equals a horrible fit.

The Petzl Dartwin with stock bars on the Phantom Guides. Not a perfect fit, but not bad. The crampons don't move on this boot while ice climbing as long as they're snug.

The Batura Evo and the Petzl Dartwin crampon with stock bars. They are a perfect fit on the front, the the heel is a little narrow on the back.


The Phantom Guide has a softer shank than the Batura which is nice for hiking, but not as ideal for steep climbing. With the Dartwins, these boots climb ice like a dream, but the stress is put on the crampon to keep the boot stiff, instead of the shank of the boot doing the work. That means that this type of boot, according to Black Diamond, could potentially lead to crampon breakage/failure sooner than a stiffer-soled boot.


The Batura Evo has a stiffer shank than the Phantom, which means it's not quite as comfortable for hiking but a little better suited for endurance ice climbing. Both boots lock my heels down pretty well, but the Phantoms lock my heels down better.

The Phantoms have a rocker of about 2.8cm. To measure the rocker I put the boot soles together and measured the distance between the two toe welts.

The Batura Evos have a rocker of 2.9cm.

2lb 8.4oz per boot in a size 45.5 Phantom Guide

2lb 13.4oz per boot in a size 46 Batura, which is actually the exact same length as a 45.5 Phantom. That's 5oz heavier per boot, which is noticeable when walking in them. Because of the added weight and stiffness, the Batura feels clunkier than the Phantom. The Phantom feels more nimble.

9.7inches circumference from the top of the footbed, around the ball of the foot, and to the top of the footbed on the other side. Though these boots are relatively low-volume for their warmth, they do feel bigger than the Phantoms.

8.5 inches circumference from top of footbed, around the ball of the foot, and to the top of the footbed on the other side. The smaller boot and light weight make this a great technical climbing boot.
The Verdict
If it's not already clear by the comments above, I personally prefer the Phantom Guides to the Baturas in most situation. The one situation in which I would choose the Baturas is for single day outings in really cold weather. While ice climbing this winter, my toes got a little cold while standing around in the Phantom Guides on some of the colder days (about 10-15 degrees F). I doubt my feet would get cold in the Baturas until it was quite a bit colder.
I really like both boots and I am glad to have both to use when I need them, but if I had to choose just one boot, I would choose the Phantom Guides. They are roomy enough in the forefoot that they easily accommodate a couple layers of thick socks which would stretch their comfort range to pretty low temps. For most anything in the lower 48 states and for all four seasons, I think either of these boots would work great.
Update (1/25/2013):
I have continued to use both boots for mixed and ice climbing and my opinion of the two haven't changed. I still prefer the Phantom Guide. After lots of use, my opinion is the same. A few people have asked me about the Batura 2.0. I have no experience with it and any information I have heard has come from various Sportiva sales reps (who are biased, as most any good rep would be). Anyway, the best information I have found on the Batura 2.0 so far is at Cold Thistle. No real surprise there. I am eager to get my hands on the Batura 2.0, but without selling the Evos first, I can't justify the price (or rather, I can't convince my wife it's a good use of our money), especially with a baby on the way. She's probably right. She usually is. Anyway, here are links for more info on the 2.0s.
Saturday, May 19, 2012
Rainier Gear Regrets
Anon asked:
Could you elaborate on what you carried and needed versus what you carried and wished you had left behind?
How did the Warmlite perform? I was wondering why in your original gearlist you were bringing 2 different tents?
I'll answer your second question first. The Warmlite performed great! It was easily big enough for three people and gear and hardly flinched in the wind. The only problem was condensation. On the section between the poles where there is a double layer of fabric, there wasn't much condensation after sleeping. But, on each of the ends where there is a single layer of sil-nylon, there definitely was a decent amount of condensation in the morning.
Originially I planned to use different tents for the separate routes because the Warmlite has such a big footprint that it is harder to find places to set it up, especially on a steep route like Liberty Ridge. The Black Diamond tent's footprint is about half the size of the Warmlite so it takes about half the time to chop out a ledge to put it on and it is easier to find a ledge big enough to set it up. Also, even though the Warmlite is super lightweight for its size, it is still about a pound heavier than the BD tent. The BD is simply better suited for steep climbing.
Unfortunately, there was a lot of gear that I took and didn't need. Some of it I used because I had it, but if I was to do the climb again, I would have left it behind. Other gear I simply didn't touch.
The following list is gear that I took and wouldn't take again with an explanation:
Clothing
MHW Compressor Pant- I used the pant around camp, but I didn't need it. I would have been just fine with a baselayer and softshell. They were nice to have once I got to camp, but I wouldn't take them again unless I was staying at Ingraham Flats for multiple days and the weather forecast called for colder weather.
Rab Neutrino- I don't think I would take the Rab Neutrino again if we were to do the same route and expected the same weather. I only used the Neutrino for about a half hour on the whole trip. I put it on on the summit and hiked in it for about 30 minutes on the way down. I could've shivered a little on top and saved the weight for the rest of the trip. The Atom LT was ideal for hiking in cold weather, and the only time it wasn't warm enough was when I wasn't moving and the wind was blowing (because of the underarm power stretch that lets the wind through). I think the Atom would've been enough to stay warm while stopped if I threw a windproof jacket (like the OR Helium) over the Atom. It the weather had been colder, maybe the Rab would've been necessary, but for this trip, it just wasn't cold enough.
Arc'teryx Alpha SV- I actually didn't take this jacket on the climb; I swapped it out for the OR Helium. I'm glad I did this. Because the weather was supposed to be pretty nice, I didn't need a heavy duty shell. I didn't use the Helium anyway, so it was about 7oz that I didn't need to carry. I'd still probably take the Helium if I had to do it again, just in case the weather turned wet.
Arc'teryx Acto MX Hoody- I really like this jacket, but it was unnecessary for this climb. The weather was dry enough and cool enough that the Atom LT worked just fine as an active layer. I took the Acto because it breathes better than the Alpha SV but is more weather resistant than the Atom. Well, because the weather was pretty dry, the Acto was unnecessary. The Atom is more wind resistant than the Acto (except under the arms) anyway so it worked better in the high winds. The Acto is nice, but not ideal for this climb. I could have saved a pound by leaving that in the car.
Equipment
Picket- It's usually a good idea to have a picket or two while traveling on glaciers, but if I were to do this route again, I think I would leave it in the car. The DC gets traveled so much and it's not extremely technical, so crevasse rescues are unlikely (and a few axes can work to make an anchor too) and there are already fixed lines on what the guides feel is potentially hazardous terrain. If I was climbing this route for the first time and nobody had climbed it previously, I still don't think there's any point on the route that I would choose to protect with a picket. So, I would leave the picket in the car.
Shovel- I took a shovel and so did Mark. It could've been nice to have two shovels to dig out a big tent platform, but it was overkill. Because I was feeling so poorly between Camp Muir and Ingraham Flats, Mark got to camp before I did and had already dug a platform with his shovel. Seth made a platform with his axe. Seth did use my shovel briefly, but he didn't need to. It actually went fairly unused. If I were to do it again, I would've only had one shovel for the group and everybody else could've used their axes.
Ice Screws- I thought it may be a good idea to have an ice screw or two for going up the Ingraham Direct route, but I don't think they're necessary. The terrain on the DC wouldn't have taken a screw (the ice was more like hard snow) and guides usually put up fixed ropes anyway on sketchy terrain. I would've probably still taken a few for the Liberty Cap on the Liberty Ridge though.
9.5mm 60m Rope- This was one of the heaviest things on my pack, and while we were using it the majority of the rope was carried over my shoulder and went unused. If I were to do the climb gain, I would've taken about 25 meters of 8mm diameter rope to save weight. My 60m rope weighs in at about 8lbs. A 25m long 8mm diameter rope would probably weigh about 3lbs.
Other random climbing gear- I took extra slings and carabiners that were unnecessary and stayed in my pack the whole trip. Before I left, I had worst-case scenarios going through my head and I planned accordingly. I also wanted to make sure I had plenty of clothing and gear to keep Kelsey warm and safe. These thoughts led me to overpack. I had enough gear to build elaborate anchors and make 5:1 haul systems. On the DC, a crevasse fall is highly improbable and with a group of four, a 5:1 haul system is unnecessary. If I were to do it again, I would've had two prussic cords for each person and a sling for ascending out of a crevasse. This requires a little know-how on ascending ropes. Seth has climbed this route multiple times without even roping up (and had climbed it a few times before that roped up), which some may feel is irresponsible, but we saw climbing rangers climbing ropeless as well. Seth climbed it this time without roping up as well. It all depends on one's comfort level on steeper terrain and on glaciers. If it wasn't a well-traveled route on the glacier or he didn't have a lot of experience reading glacier terrain, Seth definitely would've roped up.
Helmets- I took my helmet but didn't use it. We hiked early when it was cold so the chance of rockfall was minimal, and we tried to be extra careful of other climbers above us. I would never suggest that a climber doesn't take or use a helmet on any route on Rainier, but I didn't use a helmet on this climb and never felt like I was in danger. I wouldn't take a helmet if I were to do the same route in similar conditions, but if it was warmer and the chance of rockfall was higher, I probably would. I definitely would take it on Liberty Ridge. That's a no brainer.
Garmin GPS- This route is easy to follow because of wands so I never took my GPS out of my pack. If I were climbing this route for the first time and nobody in my group had been up there before, I would take my GPS in case bad weather moved in and it was hard to see. Because Seth had been up there many times, and the trail was well trampled and wanded, the GPS was unnecessary. I would leave the GPS in the car unless we expected bad weather.
There are probably other things that I took that I didn't need, but these are the things off the top of my head that I remember wishing I hadn't hauled up the mountain. I think my pack would've been about 10-15lbs lighter if I'd left these things home.
Another thing that I regret is that I didn't divide group gear a little better. Because I wanted Kelsey and Mark to have a good experience, I put most of the group gear in my pack and figured I could handle the weight. Seth carried all of his own stuff (tent, stove, etc). Mark is very strong and had no problem climbing to Ingraham Flats or to the summit. He didn't need me to carry the extra weight and my slowness probably hurt the group more than me carrying extra weight helped. Potentially because of the extra weight I was carrying, I was the weak link at times. I could've tried not to be so macho and allowed others to help share the load and I think the group would've moved faster.
One thing to always remember is that the lighter you go, the faster you can move, and potentially the safer you are. But, if you're going light and fast, it takes a little different attitude. If you are light on gear, that often means that you are more vulnerable to bad weather and waiting out storms may not be ideal. But, if you are lighter, if bad weather moves in, you can get to safety quicker. So, by leaving many of these things in the car, I accept the responsibility to know how to get to safety if I need to. It is irresponsible to climb light and fast and then need someone else to rescue you when you didn't read the weather right or didn't have the ability to climb through technical terrain with minimal protection, etc. I find that one key to going light and fast is getting out a lot. By climbing a lot, for example, you realize what you do and don't need and you acquire the skillsets to take care of yourself when things turn south.
Friday, May 18, 2012
Update to MSR Reactor BOMB
For those interested, I updated my post about the MSR Reactor BOMB about its cold-weather performance. You can find it at this link: http://gearthirty.blogspot.com/2012/03/alpine-bomb-for-msr-reactor.html
Rainier Trip Report and Pictures
On Monday, May 13, 2012, Seth and I started the 12 hour drive to Mt. Rainier to attempt two routes, the Ingraham Direct and Liberty Ridge. Unfortunately, I wasn't in good enough shape to handle the Liberty Ridge with as much speed as we needed to climb it so we decided not to attempt it on this trip. The Ingraham Direct route was blocked by a large crevasse, so the Disappointment Cleaver became our objective.
On Monday night, Seth and I met up with my wife, Kelsey, and my father-in-law, Mark. Because of other responsibilities, they were not able to drive with us and flew instead.

Left to Right, Kelsey, Seth, and Mark. We started hiking from the parking lot at about 9am on Tuesday morning. The weather was already really warm and once we got on the snow, the heat seemed to intensify immensely.

It took us about 6 total hours to get up to Ingraham Flats, 5 hours of total hiking time. I underestimated the climb up to Ingraham Flats and took too much extra gear and weight. I probably could've dropped 15-20 pounds of unnecessary weight and made the hike significantly easier.

On the Muir Snowfield heading up to Camp Muir. It was super warm on the snowfield. Kelsey and I didn't do a great job at staying on top of our hydration and nutrition and Kelsey cramped up pretty bad as she was getting close to Camp Muir. It took Seth and Mark about 20 minutes to hike the last stretch that took Kelsey and I about 60 minutes to hike (because of Kelsey's leg cramp).

Taking a brief break at Camp Muir. Left to right: Me, Seth, Kelsey. Kelsey worked her cramp out at Muir and was able to hike the rest of the way to Ingraham Flats pretty quickly. I, on the other hand, was feeling pretty horrendous heading up and over Cathedral Gap and got way behind the group. I continued to feel awful throughout the night and didn't sleep much. Luckily, I started feeling better the next morning and by the top of the Cleaver I was feeling myself again.

Arriving at Ingraham Flats. IMG guided groups below our camp.

Kelsey hiding in our bathroom hole with her toilet paper and blue bag :)

Kelsey and I.
Seth.

Little Tahoma from our camp at Ingraham Flats.

Mark hanging out at camp. Mark was nervous that he wouldn't be in good enough shape for this climb, but he ended up doing really well. He had no problem making it to the top.

Kelsey on the Disappointment Cleaver as the sun was coming up.

Kelsey and I moving up the DC ridge

Sunrise on Rainier.

Part of the Emmons Glacier, I think. These crevasses are huge! Last year when we were on Rainier, weather didn't allow us to get higher than Ingraham Flats. This year really opened my eyes to how big this mountain really is. In comparison, Rainier has about 3X the prominence that the biggest mountains in Ogden have. It was an inspiring place.

Mark on the DC.

About half way up Disappointment Cleaver. To get an idea of the scale, if you click on the picture to enlarge it, you can see two tiny people above me on the cleaver and a long chain of people on the snow just right of the rocks.

More sunrise pics

Above the Cleaver


Looking down at a group that is a few hundred yards above the cleaver

Kelsey fueling up on Poptarts

Seth at a rest stop. This guy is an animal. At the speed he hikes, he probably could've summited in two hours from Ingraham Flats. At our speed, it took about four hours.

Getting closer

Kelsey and I on the summit with our backs to the wind. The Wind was blowing so hard and the temps were cold enough that our noses would turn white pretty quickly if they weren't covered.

Mark on the summit. He didn't realize until later that the GEAR:30 sticker was upside down. Nothing photoshop can't fix, I guess.

Descending. On the way down we had an interesting experience. Seth decided not to rope up with us so he could move at a more comfortable pace. He's been up with route three or four other times and felt confident he would be ok. On the way up the route, we crossed over a crevasse on a snow bridge that was about five feet wide. On the way back down, the snow bridge had collapsed. Seth said the bridge was there when he crossed back over (about 10 minutes before we got there), but had collapsed sometime shortly after. We ended up having to jump over the crevasse which was kind of exciting.

Big crevasses above Disappointment Cleaver. I didn't get any other pictures of our descent, but it took a little less than two hours for us to get down to Ingraham Flats from the summit. It took about an 1h 15min for Seth, and that was including him waiting for us a few times. It took us about 2h 15min to get from Ingraham Flats to the Paradise parking lot. It took seth about 1h 30min. That was the theme of the trip. Seth's comfortable pace was significantly faster than ours.

When we got back to the parking lot, the summit was covered in a big lenticular cloud. When we were on the summit, wind gusts were probably around 70mph. According to a climbing ranger, the winds were supposed to intensify on the summit and stay high for a couple days.
It was a very enjoyable trip, except for the sunburns. I'm excited to get back there and do the Liberty Ridge, hopefully later this summer after I get a bit more training in.
Subscribe to:
Posts (Atom)